YOLO Animal Detection with Python: Build a Real-Time Object Detection System
Computer vision has become one of the most exciting areas of artificial intelligence. One practical application is animal detection, where an AI model can automatically identify animals in images and videos.
In this tutorial, we will build an Animal Detection System using YOLO and Python. We will start with a pretrained YOLO model, detect animals from an image, process video files, and finally create a real-time webcam detection system.
By the end of this tutorial, you will understand how YOLO works and how to integrate it into your own computer vision applications.
What Is YOLO?
YOLO (You Only Look Once) is a real-time object detection algorithm. Instead of processing an image multiple times, YOLO analyzes the image in a single neural-network inference.
A YOLO model can provide:
Object class
Bounding box coordinates
Confidence score
For example, if an image contains a dog and a cat, the model can return something similar to:
Dog   → 0.94 confidence
Cat   → 0.91 confidence
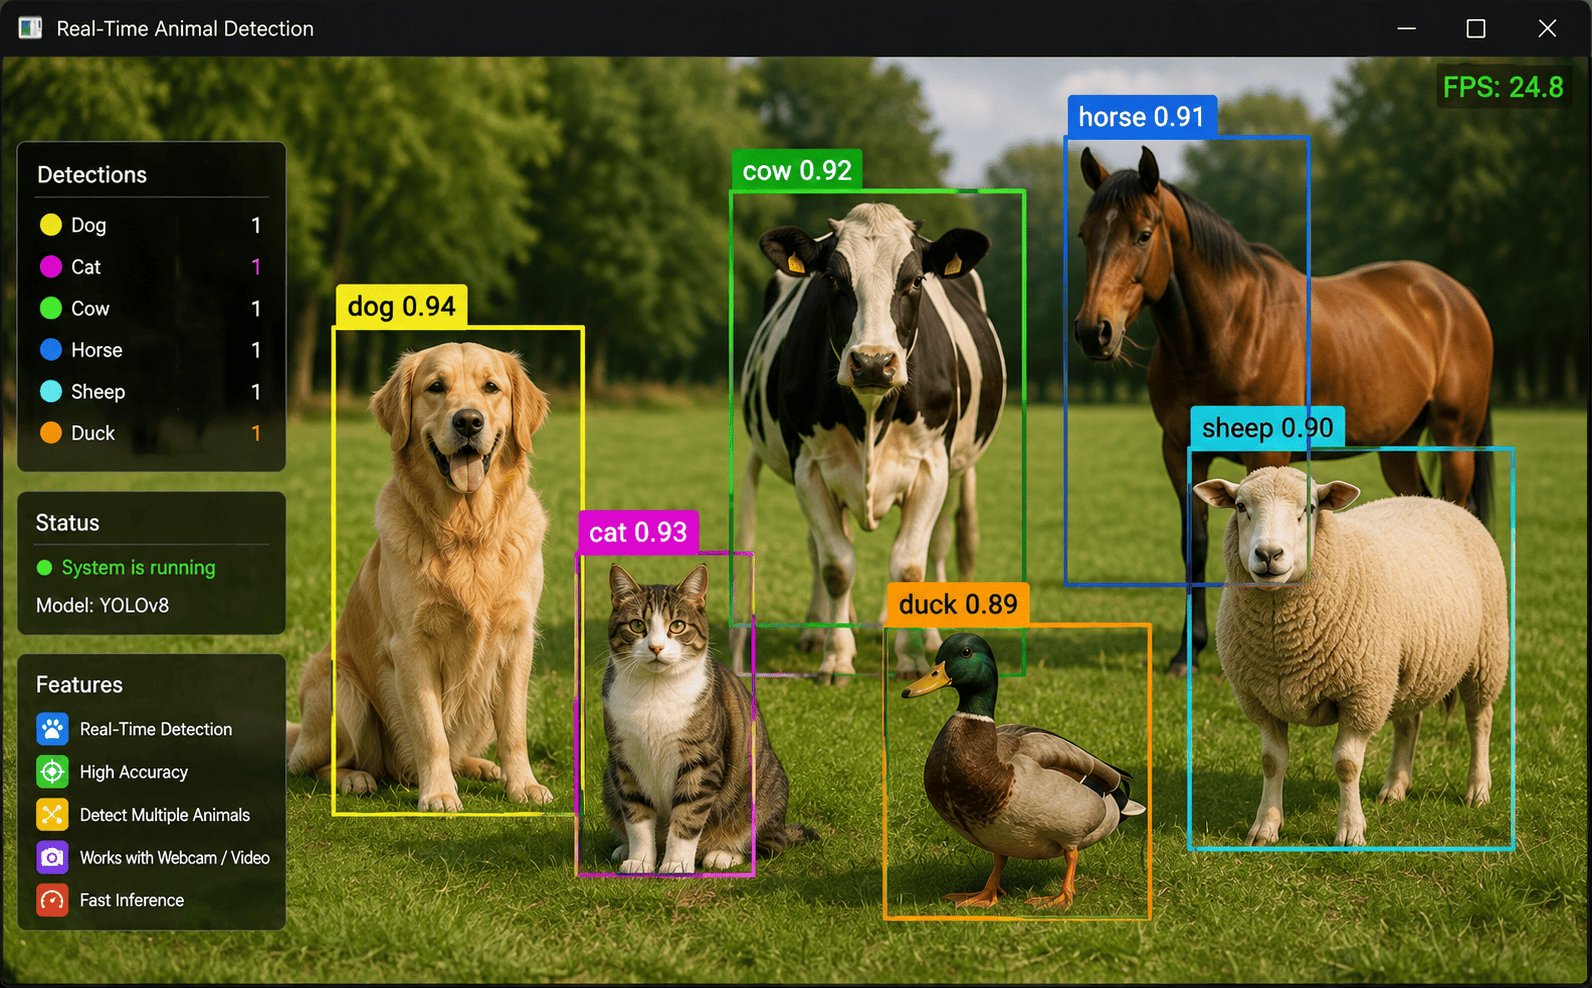
The application can then draw bounding boxes around the detected animals.
Technologies Used
For this project, we will use:
Python
YOLO
Ultralytics
OpenCV
NumPy
You don't need to build the neural network from scratch. We can use a pretrained YOLO model and run inference directly.
1. Install Python Dependencies
First, create a Python environment for the project.
You can install the required packages using:
pip install ultralytics opencv-python
You can verify that Ultralytics is installed:
python -c "from ultralytics import YOLO; print('YOLO installed successfully')"
If the command prints:
YOLO installed successfully
your environment is ready.
2. Create the Project
Create a simple project structure:
yolo-animal-detection/
│
├── images/
│   └── animals.jpg
│
├── detect_image.py
├── detect_video.py
├── webcam.py
└── requirements.txt
Create a requirements.txt file:
ultralytics
opencv-python
You can install everything using:
pip install -r requirements.txt
3. Load the YOLO Model
Create a file called:
detect_image.py
Then add:
from ultralytics import YOLO

model = YOLO("yolo11n.pt")

print("Model loaded successfully")
The model will automatically be downloaded when it is required if it is not already available locally.
The n model represents a smaller model designed for faster inference.
Depending on the YOLO version you use, the available model names may differ.
4. Detect Animals in an Image
Now let's detect objects in an image.
Update detect_image.py:
from ultralytics import YOLO

# Load YOLO model
model = YOLO("yolo11n.pt")

# Run detection
results = model("images/animals.jpg")

# Display results
for result in results:
    result.show()
Run the program:
python detect_image.py
YOLO will analyze the image and display the detected objects with bounding boxes.
For example, if the image contains a dog, you may see:
dog 0.94
The number represents the model's confidence.
5. Save the Detection Result
Instead of only displaying the result, we can save it.
from ultralytics import YOLO

model = YOLO("yolo11n.pt")

results = model("images/animals.jpg")

for result in results:
    result.save(filename="detected_animals.jpg")

print("Detection saved successfully")
After running the program, you will have:
detected_animals.jpg
with bounding boxes drawn around detected objects.
6. Get Detection Information
Sometimes we don't want to display the image. We want the detection information so that another application can use it.
For example:
from ultralytics import YOLO

model = YOLO("yolo11n.pt")

results = model("images/animals.jpg")

for result in results:

    for box in result.boxes:

        class_id = int(box.cls[0])
        confidence = float(box.conf[0])

        class_name = result.names[class_id]

        print(
            f"Object: {class_name}, "
            f"Confidence: {confidence:.2f}"
        )
The output could look like:
Object: dog, Confidence: 0.94
Object: cat, Confidence: 0.89
Object: bird, Confidence: 0.82
This is useful when integrating YOLO with another application.
7. Detect Only Animals
A pretrained model may recognize many different objects.
However, our application may only be interested in animals.
We can create a list of animal classes:
ANIMAL_CLASSES = {
    "bird",
    "cat",
    "dog",
    "horse",
    "sheep",
    "cow",
    "elephant",
    "bear",
    "zebra",
    "giraffe"
}
Then filter the detections:
from ultralytics import YOLO

model = YOLO("yolo11n.pt")

ANIMAL_CLASSES = {
    "bird",
    "cat",
    "dog",
    "horse",
    "sheep",
    "cow",
    "elephant",
    "bear",
    "zebra",
    "giraffe"
}

results = model("images/animals.jpg")

for result in results:

    for box in result.boxes:

        class_id = int(box.cls[0])
        confidence = float(box.conf[0])

        class_name = result.names[class_id]

        if class_name in ANIMAL_CLASSES:

            print(
                f"Animal: {class_name} "
                f"| Confidence: {confidence:.2f}"
            )
Now the application ignores objects that are not included in the animal list.
8. Add a Confidence Threshold
Object detection models can sometimes produce predictions with low confidence.
We can define a minimum confidence level.
For example:
CONFIDENCE_THRESHOLD = 0.50
Then:
from ultralytics import YOLO

model = YOLO("yolo11n.pt")

CONFIDENCE_THRESHOLD = 0.50

results = model("images/animals.jpg")

for result in results:

    for box in result.boxes:

        confidence = float(box.conf[0])

        if confidence < CONFIDENCE_THRESHOLD:
            continue

        class_id = int(box.cls[0])
        class_name = result.names[class_id]

        print(
            f"{class_name}: "
            f"{confidence:.2f}"
        )
This means predictions below 50% confidence are ignored.
You can experiment with values such as:
0.30
0.40
0.50
0.60
0.70
The ideal value depends on your application and dataset.
9. Real-Time Animal Detection Using Webcam
One of the most interesting applications is detecting animals from a live camera.
Create:
webcam.py
Add:
import cv2
from ultralytics import YOLO

model = YOLO("yolo11n.pt")

camera = cv2.VideoCapture(0)

while True:

    success, frame = camera.read()

    if not success:
        break

    results = model(frame)

    annotated_frame = results[0].plot()

    cv2.imshow(
        "YOLO Animal Detection",
        annotated_frame
    )

    if cv2.waitKey(1) & 0xFF == ord("q"):
        break

camera.release()
cv2.destroyAllWindows()
Run:
python webcam.py
Your webcam window should open.
The YOLO model will process each camera frame and display detected objects.
Press:
Q
to stop the application.
10. Detect Only Animals in the Webcam
We can improve the webcam application by filtering out non-animal objects.
import cv2
from ultralytics import YOLO

model = YOLO("yolo11n.pt")

ANIMAL_CLASSES = {
    "bird",
    "cat",
    "dog",
    "horse",
    "sheep",
    "cow",
    "elephant",
    "bear",
    "zebra",
    "giraffe"
}

camera = cv2.VideoCapture(0)

while True:

    success, frame = camera.read()

    if not success:
        break

    results = model(frame)

    for result in results:

        for box in result.boxes:

            confidence = float(box.conf[0])

            if confidence < 0.50:
                continue

            class_id = int(box.cls[0])
            class_name = result.names[class_id]

            if class_name not in ANIMAL_CLASSES:
                continue

            x1, y1, x2, y2 = map(
                int,
                box.xyxy[0]
            )

            label = f"{class_name} {confidence:.2f}"

            cv2.rectangle(
                frame,
                (x1, y1),
                (x2, y2),
                (0, 255, 0),
                2
            )

            cv2.putText(
                frame,
                label,
                (x1, y1 - 10),
                cv2.FONT_HERSHEY_SIMPLEX,
                0.6,
                (0, 255, 0),
                2
            )

    cv2.imshow(
        "Animal Detection",
        frame
    )

    if cv2.waitKey(1) & 0xFF == ord("q"):
        break

camera.release()
cv2.destroyAllWindows()
This version manually draws bounding boxes only around detected animals.
11. Detect Animals in a Video
YOLO can also process prerecorded videos.
Create:
detect_video.py
Then:
from ultralytics import YOLO

model = YOLO("yolo11n.pt")

results = model.predict(
    source="animals.mp4",
    save=True,
    conf=0.50
)

print("Video processing completed")
Run:
python detect_video.py
YOLO will process the video and save the detection results.
This can be useful for wildlife camera footage.
12. Processing a Video Frame by Frame
For more control, OpenCV can be used.
import cv2
from ultralytics import YOLO

model = YOLO("yolo11n.pt")

video = cv2.VideoCapture("animals.mp4")

while True:

    success, frame = video.read()

    if not success:
        break

    results = model(frame)

    frame = results[0].plot()

    cv2.imshow(
        "Animal Detection",
        frame
    )

    if cv2.waitKey(1) & 0xFF == ord("q"):
        break

video.release()
cv2.destroyAllWindows()
This gives you more flexibility because you can add your own logic for every frame.
13. Custom Animal Detection
A pretrained model is useful for common animal categories, but some projects require specialized animals.
For example, imagine building a wildlife monitoring system that needs to detect:
Leopard
Elephant
Wild Boar
Deer
Monkey
Sloth Bear
If the pretrained model does not provide these classes accurately, you should create a custom dataset.
The general workflow is:
Collect Images
      ↓
Annotate Images
      ↓
Create Dataset
      ↓
Train YOLO
      ↓
Validate Model
      ↓
Test Model
      ↓
Deploy
14. Dataset Structure
A typical YOLO dataset can look like:
animal-dataset/
│
├── images/
│   ├── train/
│   └── val/
│
├── labels/
│   ├── train/
│   └── val/
│
└── data.yaml
Each image has a corresponding label file.
For example:
images/train/elephant01.jpg
labels/train/elephant01.txt
The label file contains information about the bounding boxes.
A YOLO label generally follows:
class_id center_x center_y width height
For example:
0 0.512 0.438 0.420 0.650
The coordinates are normalized between 0 and 1.
15. Create data.yaml
An example data.yaml file:
path: ./animal-dataset

train: images/train
val: images/val

names:
  0: elephant
  1: leopard
  2: deer
  3: monkey
  4: wild_boar
The class IDs must match the labels in your dataset.
16. Train a Custom YOLO Model
Once the dataset is prepared, training can be started with Python.
from ultralytics import YOLO

model = YOLO("yolo11n.pt")

model.train(
    data="data.yaml",
    epochs=50,
    imgsz=640,
    batch=16
)
Or from the terminal:
yolo detect train \
    data=data.yaml \
    model=yolo11n.pt \
    epochs=50 \
    imgsz=640
During training, YOLO learns how to recognize the animal classes in your dataset.
17. Test the Trained Model
After training, load the resulting model:
from ultralytics import YOLO

model = YOLO(
    "runs/detect/train/weights/best.pt"
)

results = model(
    "test_image.jpg",
    conf=0.50
)

for result in results:
    result.show()
The best.pt model contains the trained weights selected during training.
18. Measuring Model Performance
When building an animal detection system, simply looking at predictions is not enough.
Important evaluation metrics include:
Precision
Precision tells us how many detected objects were actually correct.
Precision = True Positives /
            (True Positives + False Positives)
Recall
Recall measures how many of the actual objects were successfully detected.
Recall = True Positives /
         (True Positives + False Negatives)
IoU
Intersection over Union measures how closely the predicted bounding box matches the actual bounding box.
IoU =
Area of Intersection /
Area of Union
mAP
Mean Average Precision is one of the most commonly used metrics for evaluating object detection models.
19. Real-World Applications
YOLO animal detection can be used in many different projects.
Wildlife Monitoring
Camera traps can automatically detect animals in forests.
Instead of manually reviewing thousands of images, researchers can automatically filter images containing animals.
Smart Farming
Farmers can monitor livestock such as:
Cows
Sheep
Goats
Horses
Computer vision can help track animals and analyze their movement.
Road Safety
Cameras can detect animals near roads and potentially trigger warning systems.
Zoo Monitoring
Zoos can use computer vision to monitor animal movement and behavior.
Conservation
Conservation organizations can use automated detection to analyze large amounts of wildlife footage.
20. Improving YOLO Animal Detection
Model accuracy depends heavily on the quality of the dataset.
Some useful techniques include:
Collect More Images
More diverse training data generally helps the model handle different environments.
Include Different Conditions
Your dataset should include:
Day and night
Different weather
Different camera angles
Different distances
Different backgrounds
Partially hidden animals
Use Data Augmentation
Augmentation can generate variations of training images.
Common techniques include:
Rotation
Scaling
Cropping
Flipping
Brightness changes
Contrast changes
Use a Larger Model
If the smaller YOLO model does not provide sufficient accuracy, a larger model can be tested.
However, larger models generally require more computational resources.
21. Complete Simple Animal Detector
Here is a compact version that combines the main concepts:
import cv2
from ultralytics import YOLO

MODEL_PATH = "yolo11n.pt"
CONFIDENCE = 0.50

ANIMALS = {
    "bird",
    "cat",
    "dog",
    "horse",
    "sheep",
    "cow",
    "elephant",
    "bear",
    "zebra",
    "giraffe"
}

model = YOLO(MODEL_PATH)

camera = cv2.VideoCapture(0)

while True:

    success, frame = camera.read()

    if not success:
        break

    results = model(frame)

    for result in results:

        for box in result.boxes:

            confidence = float(box.conf[0])

            if confidence < CONFIDENCE:
                continue

            class_id = int(box.cls[0])
            animal = result.names[class_id]

            if animal not in ANIMALS:
                continue

            x1, y1, x2, y2 = map(
                int,
                box.xyxy[0]
            )

            cv2.rectangle(
                frame,
                (x1, y1),
                (x2, y2),
                (0, 255, 0),
                2
            )

            text = (
                f"{animal} "
                f"{confidence:.2f}"
            )

            cv2.putText(
                frame,
                text,
                (x1, y1 - 10),
                cv2.FONT_HERSHEY_SIMPLEX,
                0.6,
                (0, 255, 0),
                2
            )

    cv2.imshow(
        "YOLO Animal Detection",
        frame
    )

    if cv2.waitKey(1) & 0xFF == ord("q"):
        break

camera.release()
cv2.destroyAllWindows()
This gives you a basic but complete real-time animal detection application.
Conclusion
YOLO makes it relatively straightforward to build real-time animal detection applications using Python.
With just a few lines of code, developers can load a pretrained model and detect objects from images, videos, and live camera streams. For more specialized applications, a custom dataset can be created and used to train a model for specific animal species.
The complete process can be summarized as:
YOLO Model
    ↓
Image / Video / Camera
    ↓
Object Detection
    ↓
Animal Classification
    ↓
Confidence Filtering
    ↓
Bounding Boxes
    ↓
Application
The real power of YOLO comes when it is combined with other technologies. A trained animal detection model can be connected to a web dashboard, mobile application, IoT camera, wildlife monitoring system, or cloud-based AI platform.
If you are starting with computer vision, building an animal detector is an excellent project because it teaches the fundamentals of object detection, deep learning, image processing, model training, and real-time AI inference.