YOLO Helmet Detection Using Python: Build a Real-Time Helmet Detection System
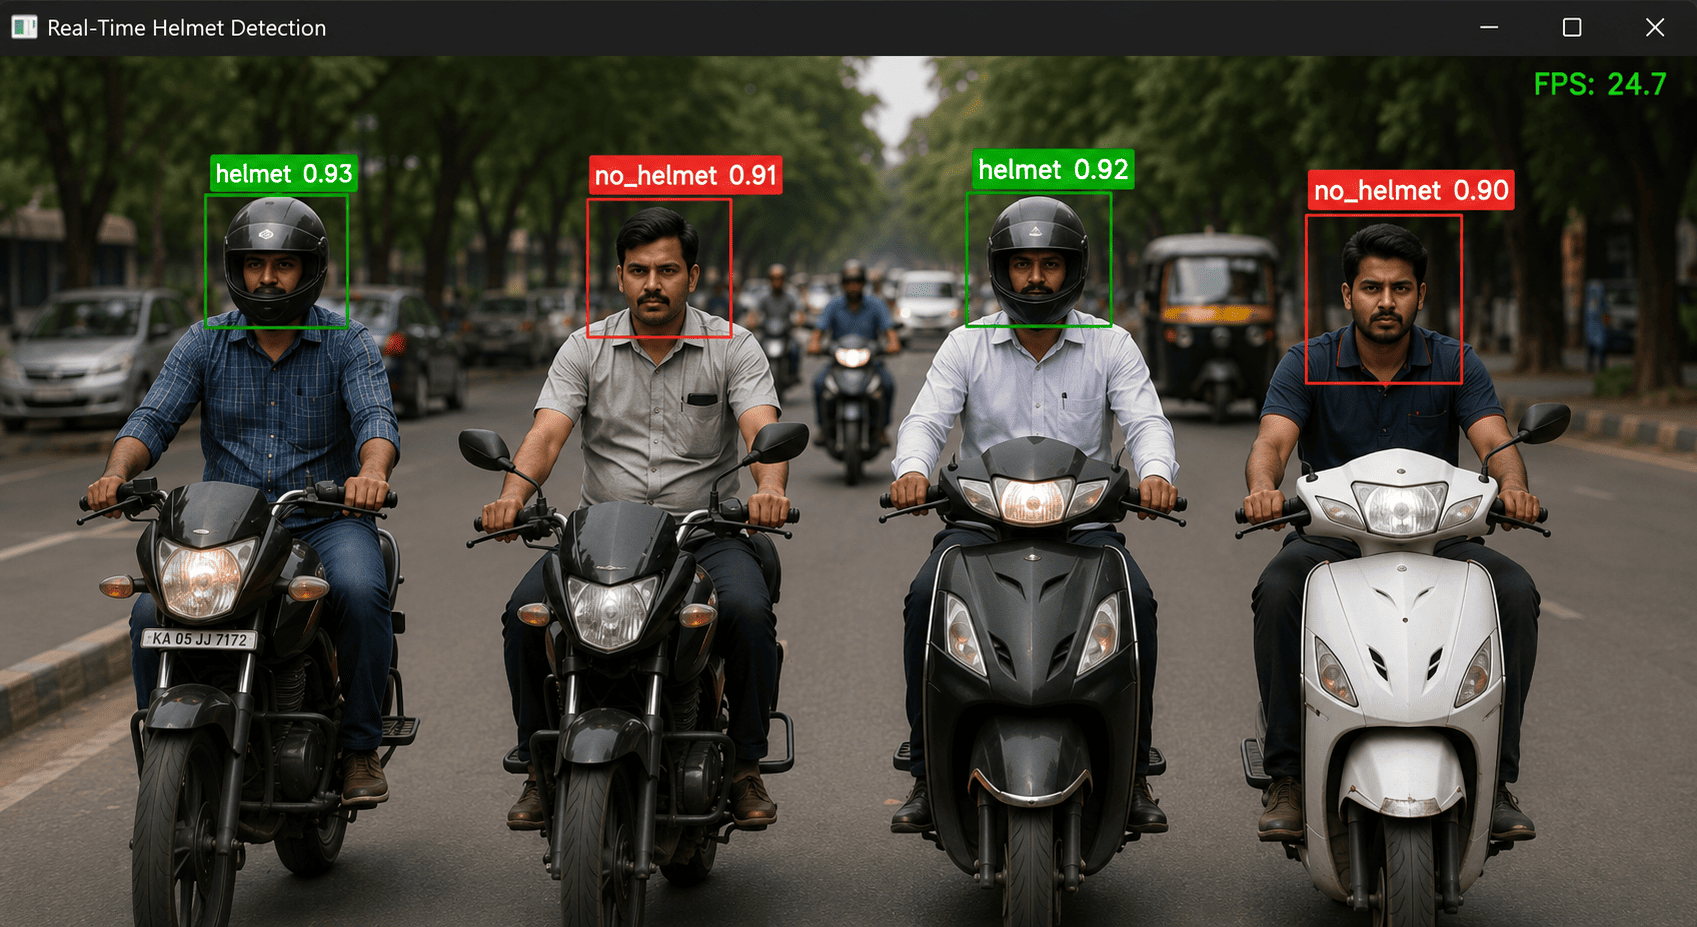
Road safety is an important application of computer vision and artificial intelligence. One useful application is helmet detection, where an AI system automatically checks whether motorcycle or scooter riders are wearing helmets.
Traditional monitoring requires security personnel or traffic officers to manually observe riders. A computer vision system can automate part of this process by analyzing images or video from cameras and detecting riders who are wearing or not wearing helmets.
In this tutorial, we will build a Helmet Detection System using YOLO, Python, and OpenCV.
We will cover:
What helmet detection is
How YOLO works
Detecting helmets in images
Detecting helmets in real-time video
Using confidence thresholds
Training a custom helmet detection model
Detecting riders without helmets
Connecting detection to an alert system
Building a complete helmet detection pipeline
What Is Helmet Detection?
Helmet detection is a computer vision task where an AI model identifies whether a person, particularly a motorcycle rider, is wearing a helmet.
A typical system may detect classes such as:
Helmet
No Helmet
Person
Motorcycle
For example, a camera could capture a motorcycle rider and the model could produce:
Person       → 96%
Motorcycle   → 93%
Helmet       → 91%
For another rider:
Person       → 95%
Motorcycle   → 89%
No Helmet    → 94%
The application can then trigger an alert or record the event.
Why Use YOLO for Helmet Detection?
YOLO is a real-time object detection model that can detect multiple objects in a single image or video frame.
For helmet detection, YOLO can identify:
Helmet
No helmet
Person
Motorcycle
Scooter
The model provides:
Class
Bounding Box
Confidence Score
For example:
Helmet
Confidence: 0.94

Bounding Box:
x1 = 250
y1 = 120
x2 = 350
y2 = 240
YOLO is particularly useful when the detection needs to happen in real time.
Important: Pretrained Model vs Custom Model
One important thing to understand is that a general-purpose pretrained YOLO model may not contain helmet and no-helmet classes.
For example, a standard model may recognize:
person
motorcycle
car
bus
truck
but that does not automatically mean it can determine whether a person is wearing a helmet.
For a reliable helmet detection system, you will usually need a custom dataset and custom-trained YOLO model.
The workflow is:
Collect Helmet Images
        ↓
Annotate Images
        ↓
Create YOLO Dataset
        ↓
Train Custom Model
        ↓
Validate Model
        ↓
Test Model
        ↓
Deploy
Technologies Used
This project uses:
Python
YOLO
Ultralytics
OpenCV
Install the required packages:
pip install ultralytics opencv-python
Create a requirements.txt file:
ultralytics
opencv-python
Then:
pip install -r requirements.txt
Project Structure
A simple project can look like:
yolo-helmet-detection/
│
├── images/
│   └── rider.jpg
│
├── videos/
│   └── traffic.mp4
│
├── detect_image.py
├── webcam.py
├── detect_video.py
├── train.py
└── requirements.txt
1. Load the YOLO Model
Create:
detect_image.py
Then:
from ultralytics import YOLO

model = YOLO("best.pt")

print("Helmet detection model loaded")
Here:
best.pt
should be the custom model trained on your helmet dataset.
For initial experiments, you can also load a general YOLO model, but it will only detect the classes it was trained on.
2. Detect Helmets in an Image
Once you have a trained model, detecting helmets is straightforward.
from ultralytics import YOLO

model = YOLO("best.pt")

results = model("images/rider.jpg")

for result in results:
    result.show()
Run:
python detect_image.py
The model will analyze the image and draw bounding boxes around detected classes.
For example:
Helmet      0.94
No Helmet   0.91
Person      0.96
Motorcycle  0.93
3. Get Detection Information
Instead of displaying the image, we can read the prediction results.
from ultralytics import YOLO

model = YOLO("best.pt")

results = model("images/rider.jpg")

for result in results:

    for box in result.boxes:

        class_id = int(box.cls[0])
        confidence = float(box.conf[0])

        class_name = result.names[class_id]

        print(
            f"Class: {class_name} | "
            f"Confidence: {confidence:.2f}"
        )
Example output:
Class: person | Confidence: 0.96
Class: motorcycle | Confidence: 0.93
Class: helmet | Confidence: 0.94
This information can be sent to another application or stored in a database.
4. Add a Confidence Threshold
AI models can sometimes produce predictions with low confidence.
We can ignore predictions below a certain threshold.
from ultralytics import YOLO

model = YOLO("best.pt")

results = model(
    "images/rider.jpg",
    conf=0.50
)

for result in results:
    result.show()
Here:
conf=0.50
means predictions below 50% confidence are filtered out.
You can experiment with:
0.30
0.40
0.50
0.60
0.70
The appropriate value depends on your dataset and application.
5. Detect Helmet and No Helmet
Suppose your custom model has these classes:
0 → helmet
1 → no_helmet
2 → person
3 → motorcycle
You can detect violations using:
from ultralytics import YOLO

model = YOLO("best.pt")

results = model(
    "images/rider.jpg",
    conf=0.50
)

for result in results:

    for box in result.boxes:

        class_id = int(box.cls[0])
        confidence = float(box.conf[0])

        class_name = result.names[class_id]

        if class_name == "no_helmet":

            print(
                f"HELMET VIOLATION | "
                f"Confidence: {confidence:.2f}"
            )
Example:
HELMET VIOLATION | Confidence: 0.94
This is the basic logic behind an automated helmet monitoring system.
6. Save Detection Results
We can save the annotated image:
from ultralytics import YOLO

model = YOLO("best.pt")

results = model("images/rider.jpg")

for result in results:

    result.save(
        filename="helmet_detection.jpg"
    )

print("Detection saved")
The resulting image contains the detected bounding boxes.
7. Real-Time Helmet Detection With Webcam
We can use OpenCV to read frames from a webcam.
Create:
webcam.py
Then:
import cv2
from ultralytics import YOLO

model = YOLO("best.pt")

camera = cv2.VideoCapture(0)

while True:

    success, frame = camera.read()

    if not success:
        break

    results = model(frame)

    annotated_frame = results[0].plot()

    cv2.imshow(
        "Helmet Detection",
        annotated_frame
    )

    if cv2.waitKey(1) & 0xFF == ord("q"):
        break

camera.release()
cv2.destroyAllWindows()
Run:
python webcam.py
The camera will open and the model will analyze each frame.
Press:
Q
to stop the application.
8. Manually Display Helmet Violations
We can create custom logic to display only helmet violations.
import cv2
from ultralytics import YOLO

model = YOLO("best.pt")

camera = cv2.VideoCapture(0)

while True:

    success, frame = camera.read()

    if not success:
        break

    results = model(
        frame,
        conf=0.50
    )

    for result in results:

        for box in result.boxes:

            class_id = int(box.cls[0])
            confidence = float(box.conf[0])

            class_name = result.names[class_id]

            if class_name != "no_helmet":
                continue

            x1, y1, x2, y2 = map(
                int,
                box.xyxy[0]
            )

            label = (
                f"NO HELMET "
                f"{confidence:.2f}"
            )

            cv2.rectangle(
                frame,
                (x1, y1),
                (x2, y2),
                (0, 0, 255),
                2
            )

            cv2.putText(
                frame,
                label,
                (x1, y1 - 10),
                cv2.FONT_HERSHEY_SIMPLEX,
                0.7,
                (0, 0, 255),
                2
            )

    cv2.imshow(
        "Helmet Violation Detection",
        frame
    )

    if cv2.waitKey(1) & 0xFF == ord("q"):
        break

camera.release()
cv2.destroyAllWindows()
This example highlights riders classified as no_helmet.
9. Count Helmet Violations
We can maintain a counter:
violations = 0
Then:
if class_name == "no_helmet":

    violations += 1
However, this has a major problem.
If a person remains visible for 100 video frames, the same person could be counted 100 times.
Therefore, for video-based violation counting, object tracking should be used.
10. Helmet Detection With Tracking
YOLO tracking can maintain an ID for detected objects.
Example:
import cv2
from ultralytics import YOLO

model = YOLO("best.pt")

camera = cv2.VideoCapture(0)

while True:

    success, frame = camera.read()

    if not success:
        break

    results = model.track(
        frame,
        persist=True,
        tracker="bytetrack.yaml",
        conf=0.50
    )

    annotated_frame = results[0].plot()

    cv2.imshow(
        "Helmet Tracking",
        annotated_frame
    )

    if cv2.waitKey(1) & 0xFF == ord("q"):
        break

camera.release()
cv2.destroyAllWindows()
The tracker can assign IDs such as:
Person ID: 1
Person ID: 2
Person ID: 3
This helps prevent repeatedly counting the same rider.
11. Detect Motorcycles and Helmets
A more advanced model can be trained with multiple classes:
person
motorcycle
helmet
no_helmet
The system can then analyze the scene.
Conceptually:
Camera
   ↓
YOLO Detection
   ↓
Person + Motorcycle
   ↓
Helmet / No Helmet
   ↓
Violation Detection
This is more useful than simply detecting a no_helmet object because the application can use the surrounding context.
12. Create a Custom Helmet Dataset
For a production-quality system, collect images containing motorcycle riders.
The dataset should contain different:
Helmet types
Motorcycle types
Camera angles
Lighting conditions
Weather conditions
Rider positions
Distances
Traffic densities
For example:
helmet
no_helmet
person
motorcycle
A dataset structure can look like:
helmet-dataset/
│
├── images/
│   ├── train/
│   └── val/
│
├── labels/
│   ├── train/
│   └── val/
│
└── data.yaml
13. Annotate Helmet Images
Each object needs a bounding box.
For example:
Image: rider01.jpg

Object:
helmet

Bounding Box:
x1 = 240
y1 = 80
x2 = 330
y2 = 180
For a rider without a helmet:
Object:
no_helmet
You should annotate the objects consistently across the dataset.
For example:
helmet
no_helmet
person
motorcycle
14. YOLO Annotation Format
YOLO labels generally use:
class_id center_x center_y width height
Example:
0 0.520 0.250 0.120 0.180
The coordinates are normalized between 0 and 1.
For example:
0 → helmet
1 → no_helmet
2 → person
3 → motorcycle
The exact class IDs depend on how you define your dataset.
15. Create data.yaml
Create:
data.yaml
Example:
path: ./helmet-dataset

train: images/train
val: images/val

names:
  0: helmet
  1: no_helmet
  2: person
  3: motorcycle
The class names and IDs must match your annotation files.
16. Train a Custom Helmet Detection Model
Create:
train.py
Then:
from ultralytics import YOLO

model = YOLO("yolo11n.pt")

model.train(
    data="data.yaml",
    epochs=50,
    imgsz=640,
    batch=16
)
Run:
python train.py
During training, the model learns visual features associated with helmets and non-helmet situations.
These features may include:
Helmet shape
Helmet position
Head region
Rider position
Motorcycle position
Visual patterns
17. Train From the Command Line
You can also use:
yolo detect train \
    data=data.yaml \
    model=yolo11n.pt \
    epochs=50 \
    imgsz=640
A GPU is recommended when training larger datasets.
18. Test the Custom Model
After training, load the best model:
from ultralytics import YOLO

model = YOLO(
    "runs/detect/train/weights/best.pt"
)

results = model(
    "test_rider.jpg",
    conf=0.50
)

for result in results:
    result.show()
If the model is performing well, it should detect objects such as:
helmet
no_helmet
person
motorcycle
19. Detect Helmet Violations From a Video
A traffic camera can be processed using:
from ultralytics import YOLO

model = YOLO("best.pt")

results = model.track(
    source="videos/traffic.mp4",
    tracker="bytetrack.yaml",
    save=True,
    conf=0.50
)
The model will process the video and save an annotated version.
This can be useful for analyzing recorded traffic footage.
20. Save Violation Information
When a no_helmet detection occurs, you may want to store information such as:
Timestamp
Camera ID
Tracking ID
Confidence
Image Path
For example:
from datetime import datetime

violation = {
    "timestamp": datetime.now().isoformat(),
    "camera_id": "CAM-01",
    "type": "NO_HELMET",
    "confidence": 0.94
}

print(violation)
Example output:
{
    'timestamp': '2026-08-10T10:30:25',
    'camera_id': 'CAM-01',
    'type': 'NO_HELMET',
    'confidence': 0.94
}
In a production application, this information could be stored in a database.
21. Connect Helmet Detection to an API
A computer vision application can send violation information to a backend server.
For example:
import requests

data = {
    "camera_id": "CAM-01",
    "violation": "NO_HELMET",
    "confidence": 0.94
}

response = requests.post(
    "https://example.com/api/violations",
    json=data
)

print(response.status_code)
The backend can then store the event.
A typical architecture could be:
Camera
   ↓
YOLO
   ↓
Helmet Detection
   ↓
Violation
   ↓
Python Application
   ↓
Backend API
   ↓
Database
   ↓
Dashboard
22. Build a Helmet Monitoring Dashboard
The detection system can be connected to a web dashboard.
For example:
========================================
       HELMET MONITORING SYSTEM
========================================

Total Riders       1,250

Helmet Detected    1,132

No Helmet            118

Compliance          90.56%

========================================
The dashboard could also display:
Live camera feed
Violation count
Detection confidence
Camera location
Timestamp
Daily statistics
Weekly statistics
23. Calculate Helmet Compliance
If the system detects:
Total Riders = 1,250
Helmet = 1,132
we can calculate:
total_riders = 1250
helmet_users = 1132

compliance = (
    helmet_users /
    total_riders
) * 100

print(
    f"Helmet Compliance: "
    f"{compliance:.2f}%"
)
Output:
Helmet Compliance: 90.56%
This can be useful for traffic safety analytics.
24. Improving Helmet Detection Accuracy
Real-world helmet detection can be challenging.
Some common problems include:
Riders far from the camera
Low-resolution video
Night-time conditions
Heavy traffic
Riders overlapping
Different helmet designs
Helmets partially hidden
Poor camera angles
Motion blur
Several techniques can improve performance.
Use More Training Images
A diverse dataset generally produces a more robust model.
Include Different Helmet Types
Include:
Full-face helmets
Half helmets
Open-face helmets
Different colors
Different shapes
Include Different Environments
Your dataset should contain:
Day
Night
Rain
Sunny
Indoor
Outdoor
Heavy traffic
Light traffic
Use Data Augmentation
Common augmentation techniques include:
Rotation
Scaling
Cropping
Flipping
Brightness changes
Contrast changes
25. Model Evaluation
A helmet detection model should be evaluated before deployment.
Important metrics include:
Precision
Precision measures how many predicted violations are actually correct.
Precision =
True Positives /
(True Positives + False Positives)
Recall
Recall measures how many actual violations were detected.
Recall =
True Positives /
(True Positives + False Negatives)
IoU
Intersection over Union evaluates bounding-box overlap.
IoU =
Intersection Area /
Union Area
mAP
Mean Average Precision is commonly used for object detection evaluation.
26. Important Real-World Considerations
A helmet detection model should not automatically be treated as a perfect enforcement system.
False positives and false negatives can occur.
For example, a rider may be wearing a helmet that is partially hidden from the camera. The model might incorrectly classify the rider as not wearing one.
Similarly, unusual camera angles can affect predictions.
For applications involving penalties or legal enforcement, detections should be subject to appropriate review and validation rather than relying blindly on a single AI prediction.
27. Complete Helmet Detection Example
Here is a simple real-time implementation using a custom YOLO model:
import cv2
from ultralytics import YOLO

MODEL_PATH = "best.pt"
CONFIDENCE = 0.50

model = YOLO(MODEL_PATH)

camera = cv2.VideoCapture(0)

while True:

    success, frame = camera.read()

    if not success:
        break

    results = model(
        frame,
        conf=CONFIDENCE
    )

    for result in results:

        for box in result.boxes:

            class_id = int(box.cls[0])
            confidence = float(box.conf[0])

            class_name = result.names[class_id]

            x1, y1, x2, y2 = map(
                int,
                box.xyxy[0]
            )

            label = (
                f"{class_name} "
                f"{confidence:.2f}"
            )

            cv2.rectangle(
                frame,
                (x1, y1),
                (x2, y2),
                (0, 255, 0),
                2
            )

            cv2.putText(
                frame,
                label,
                (x1, y1 - 10),
                cv2.FONT_HERSHEY_SIMPLEX,
                0.6,
                (0, 255, 0),
                2
            )

    cv2.imshow(
        "YOLO Helmet Detection",
        frame
    )

    if cv2.waitKey(1) & 0xFF == ord("q"):
        break

camera.release()
cv2.destroyAllWindows()
Replace:
best.pt
with the path to your trained helmet detection model.
Complete Helmet Detection Workflow
The entire project can be summarized as:
                CAMERA
                   ↓
              VIDEO FRAME
                   ↓
             YOLO MODEL
                   ↓
        ┌──────────┴──────────┐
        ↓                     ↓
      PERSON               MOTORCYCLE
        ↓
   HELMET CHECK
        ↓
 ┌──────┴────────┐
 ↓               ↓
HELMET        NO HELMET
 ↓               ↓
Valid          Violation
                 ↓
             Tracking
                 ↓
          Event Recording
                 ↓
            Database
                 ↓
             Dashboard
Conclusion
YOLO provides a powerful foundation for building real-time helmet detection systems.
A basic implementation can detect helmets in images, while a more advanced system can analyze live traffic cameras, track riders, count violations, and send detection events to a backend server.
The most important part of a reliable helmet detection system is the training dataset. A model trained on diverse images from different cameras, lighting conditions, helmet types, and traffic environments will generally be more robust than a model trained on a small or repetitive dataset.
A complete production architecture can combine:
YOLO
+
OpenCV
+
Object Tracking
+
Python
+
Backend API
+
Database
+
Web Dashboard
This combination can be used to build intelligent traffic-monitoring and road-safety applications while keeping appropriate human review and operational safeguards in place.