
YOLO People Counting Using Python: Build a Real-Time People Counting System
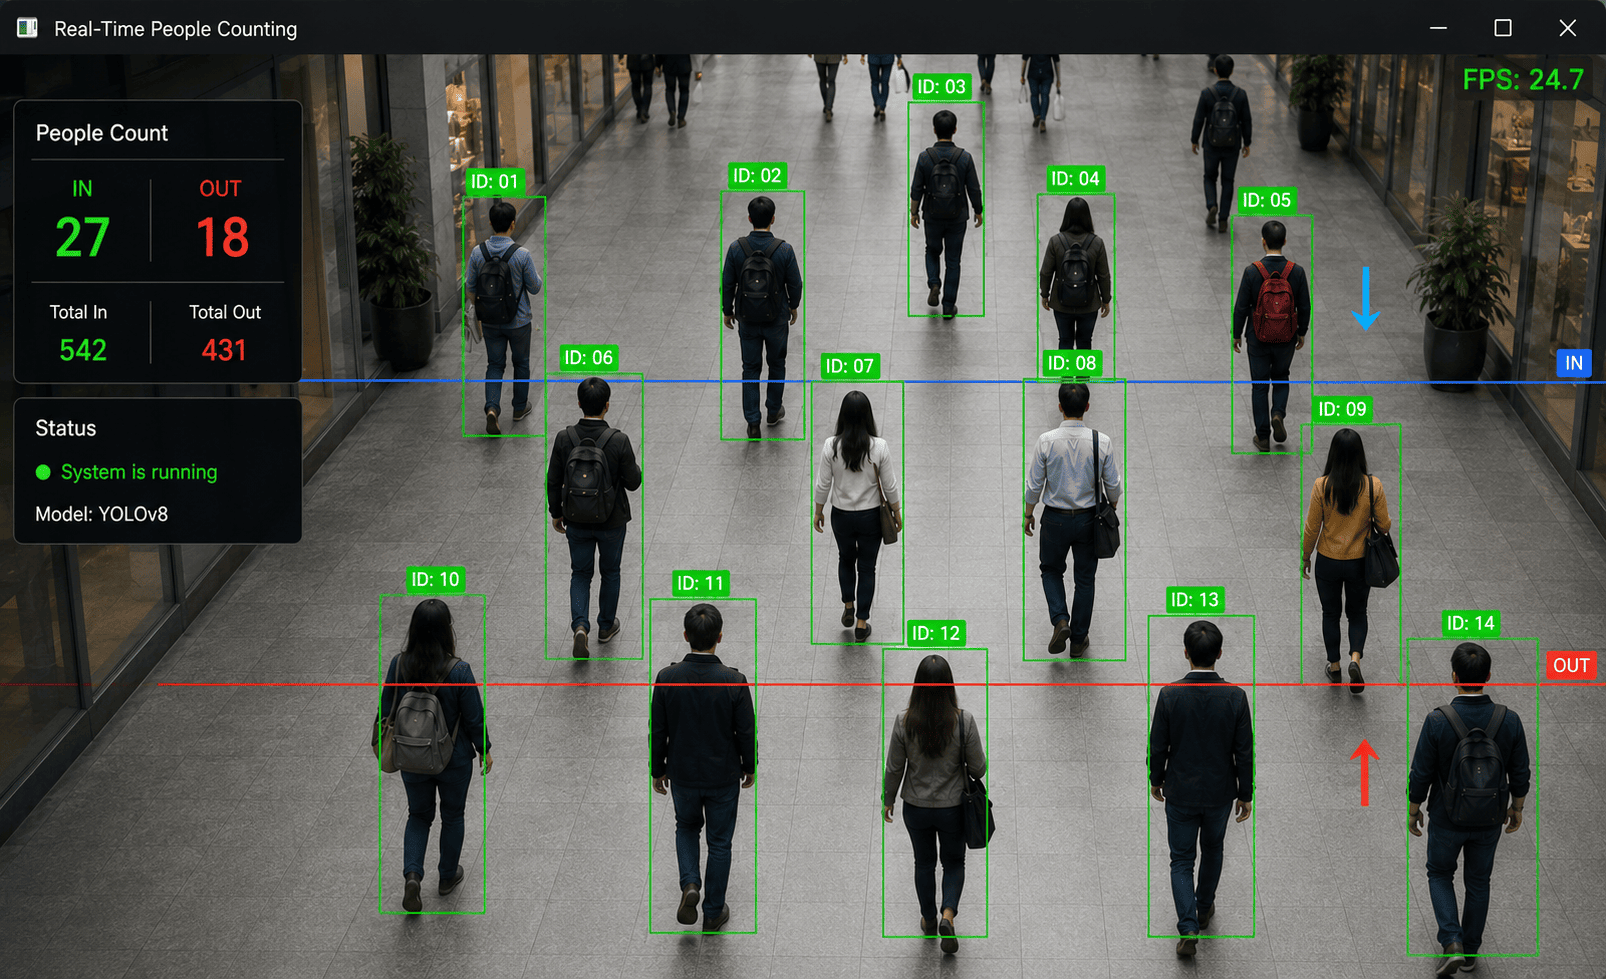
People counting is a popular computer vision application that uses artificial intelligence to automatically detect and count people in images and videos.
It can be used in shopping malls, retail stores, offices, airports, schools, events, public spaces, and security systems.
A simple object detection model can identify people in each video frame. However, there is an important problem: the same person appears in many consecutive frames.
If we simply count every detection, one person walking across a camera could be counted hundreds of times.
To solve this problem, we can combine YOLO object detection with object tracking. The tracker assigns a unique ID to each detected person and keeps track of them as they move through the video.
In this tutorial, we will build a real-time People Counting System using Python, YOLO, OpenCV, and object tracking.
What Is People Counting?
People counting is the process of automatically determining how many people are present in a camera view or how many people pass through a specific area.
For example, a camera may detect:
Person 1
Person 2
Person 3
Person 4
The application can then display:
Current People: 4
A more advanced system can count people entering and leaving an area:
Entered: 25
Exited: 18
Currently Inside: 7
This makes people counting useful for real-world monitoring systems.
Why Use YOLO?
YOLO is a real-time object detection model that can identify objects in images and videos.
For people counting, we are mainly interested in the person class.
For every detected person, YOLO provides:
Bounding box
Class
Confidence score
For example:
Person
Confidence: 0.94

Bounding Box:
x1 = 150
y1 = 100
x2 = 300
y2 = 450
YOLO is particularly useful because it can process video frames quickly.
Why Detection Alone Is Not Enough
Consider a video containing one person.
The camera might capture:
Frame 1 → Person detected
Frame 2 → Person detected
Frame 3 → Person detected
Frame 4 → Person detected
Frame 5 → Person detected
If we simply increase the counter for every detection:
People = 5
But there is actually only:
People = 1
This is why object tracking is important.
A tracker can assign an ID:
Frame 1 → Person ID 1
Frame 2 → Person ID 1
Frame 3 → Person ID 1
Frame 4 → Person ID 1
Frame 5 → Person ID 1
Now the application understands that all five detections belong to the same person.
Technologies Used
This project uses:
Python
YOLO
Ultralytics
OpenCV
Object Tracking
Install the required packages:
pip install ultralytics opencv-python
Create a requirements.txt file:
ultralytics
opencv-python
Install the dependencies:
pip install -r requirements.txt
Project Structure
Create a project directory:
yolo-people-counting/
│
├── videos/
│   └── people.mp4
│
├── people_count.py
├── webcam_count.py
└── requirements.txt
1. Load the YOLO Model
Create:
people_count.py
Then:
from ultralytics import YOLO

model = YOLO("yolo11n.pt")

print("YOLO model loaded successfully")
The model will be downloaded automatically if it is not already available locally.
2. Detect People in an Image
Before working with video, let's start with a single image.
from ultralytics import YOLO

model = YOLO("yolo11n.pt")

results = model("people.jpg")

for result in results:
    result.show()
Run:
python people_count.py
The model will detect objects in the image.
If people are present, YOLO can identify them using the person class.
3. Detect Only People
YOLO models can detect multiple object categories.
For a people-counting system, we only need the person class.
We can filter the results:
from ultralytics import YOLO

model = YOLO("yolo11n.pt")

results = model("people.jpg")

for result in results:

    for box in result.boxes:

        class_id = int(box.cls[0])
        confidence = float(box.conf[0])

        class_name = result.names[class_id]

        if class_name == "person":

            print(
                f"Person detected | "
                f"Confidence: {confidence:.2f}"
            )
Example output:
Person detected | Confidence: 0.94
Person detected | Confidence: 0.91
Person detected | Confidence: 0.87
4. Count People in an Image
If we only need to count people in a single image, we can count the number of person detections.
from ultralytics import YOLO

model = YOLO("yolo11n.pt")

results = model("people.jpg")

people_count = 0

for result in results:

    for box in result.boxes:

        class_id = int(box.cls[0])
        class_name = result.names[class_id]

        if class_name == "person":
            people_count += 1

print("People:", people_count)
Example:
People: 7
This works well for a single image.
However, it is not sufficient for counting people in a video.
5. Simple Real-Time People Detection
Let's create a webcam application.
import cv2
from ultralytics import YOLO

model = YOLO("yolo11n.pt")

camera = cv2.VideoCapture(0)

while True:

    success, frame = camera.read()

    if not success:
        break

    results = model(frame)

    annotated_frame = results[0].plot()

    cv2.imshow(
        "People Detection",
        annotated_frame
    )

    if cv2.waitKey(1) & 0xFF == ord("q"):
        break

camera.release()
cv2.destroyAllWindows()
Run:
python people_count.py
This will open the webcam and detect people in real time.
6. Display the Current Number of People
We can count the people detected in each frame.
import cv2
from ultralytics import YOLO

model = YOLO("yolo11n.pt")

camera = cv2.VideoCapture(0)

while True:

    success, frame = camera.read()

    if not success:
        break

    results = model(frame)

    people_count = 0

    for result in results:

        for box in result.boxes:

            class_id = int(box.cls[0])
            class_name = result.names[class_id]

            if class_name == "person":
                people_count += 1

    cv2.putText(
        frame,
        f"People: {people_count}",
        (30, 50),
        cv2.FONT_HERSHEY_SIMPLEX,
        1,
        (0, 255, 0),
        2
    )

    cv2.imshow(
        "People Counting",
        frame
    )

    if cv2.waitKey(1) & 0xFF == ord("q"):
        break

camera.release()
cv2.destroyAllWindows()
This shows the number of people detected in the current frame.
For example:
People: 6
However, this is still not a true entry/exit counting system.
7. Why Tracking Is Important
Imagine five people walking through a camera.
The first frame might detect:
Person A
Person B
Person C
Person D
Person E
The next frame detects the same people:
Person A
Person B
Person C
Person D
Person E
If we count every frame, the counter increases continuously.
Instead, we need persistent IDs:
ID 1 → Person A
ID 2 → Person B
ID 3 → Person C
ID 4 → Person D
ID 5 → Person E
The tracker attempts to keep these IDs associated with the same people across frames.
8. YOLO Tracking
Ultralytics provides tracking functionality that can be used with YOLO.
A simple tracking example:
from ultralytics import YOLO

model = YOLO("yolo11n.pt")

results = model.track(
    source="people.mp4",
    show=True,
    tracker="bytetrack.yaml"
)
Here we use:
ByteTrack
as the tracking algorithm.
The exact tracking configuration can be adjusted depending on the application.
9. Real-Time People Tracking
Let's build a webcam tracker.
Create:
webcam_count.py
Add:
import cv2
from ultralytics import YOLO

model = YOLO("yolo11n.pt")

camera = cv2.VideoCapture(0)

while True:

    success, frame = camera.read()

    if not success:
        break

    results = model.track(
        frame,
        persist=True,
        classes=[0],
        tracker="bytetrack.yaml"
    )

    annotated_frame = results[0].plot()

    cv2.imshow(
        "People Tracking",
        annotated_frame
    )

    if cv2.waitKey(1) & 0xFF == ord("q"):
        break

camera.release()
cv2.destroyAllWindows()
The important parameters are:
persist=True
and:
tracker="bytetrack.yaml"
persist=True tells the tracker to maintain tracking information across video frames.
classes=[0] limits detection to the person class for standard COCO-trained models.
10. Count Unique People
Now we can maintain a set of tracking IDs.
import cv2
from ultralytics import YOLO

model = YOLO("yolo11n.pt")

camera = cv2.VideoCapture(0)

unique_people = set()

while True:

    success, frame = camera.read()

    if not success:
        break

    results = model.track(
        frame,
        persist=True,
        classes=[0],
        tracker="bytetrack.yaml"
    )

    result = results[0]

    if result.boxes.id is not None:

        track_ids = result.boxes.id.int().cpu().tolist()

        for track_id in track_ids:
            unique_people.add(track_id)

    annotated_frame = result.plot()

    cv2.putText(
        annotated_frame,
        f"Unique People: {len(unique_people)}",
        (30, 50),
        cv2.FONT_HERSHEY_SIMPLEX,
        1,
        (0, 255, 0),
        2
    )

    cv2.imshow(
        "People Counting",
        annotated_frame
    )

    if cv2.waitKey(1) & 0xFF == ord("q"):
        break

camera.release()
cv2.destroyAllWindows()
Now the system keeps track of the IDs it has seen.
For example:
ID 1
ID 2
ID 3
ID 4
The counter becomes:
Unique People: 4
This is useful when you want to estimate how many unique people appeared during a camera session.
11. Entry and Exit Counting
A more advanced system can count people crossing a virtual line.
Imagine a camera pointed at a store entrance.
We can draw a line:
--------------------------------
          COUNTING LINE
--------------------------------
When a person crosses the line from one side to another:
Outside → Inside
we increment:
Entered += 1
If someone crosses in the opposite direction:
Inside → Outside
we increment:
Exited += 1
Then:
Current People = Entered - Exited
12. Define a Counting Line
For example:
LINE_Y = 300
We can draw the line using OpenCV:
cv2.line(
    frame,
    (0, LINE_Y),
    (frame.shape[1], LINE_Y),
    (255, 0, 0),
    2
)
This creates a horizontal line across the camera frame.
13. Detect When a Person Crosses the Line
We can calculate the center of a person's bounding box.
x1, y1, x2, y2 = map(
    int,
    box.xyxy[0]
)

center_x = (x1 + x2) // 2
center_y = (y1 + y2) // 2
Now we know the person's approximate center position.
If:
Previous Y < LINE_Y
and:
Current Y >= LINE_Y
the person crossed the line downward.
14. Complete Entry Counting Example
Here is a simple implementation:
import cv2
from ultralytics import YOLO

model = YOLO("yolo11n.pt")

camera = cv2.VideoCapture(0)

LINE_Y = 300

entered = 0

previous_positions = {}

counted_ids = set()

while True:

    success, frame = camera.read()

    if not success:
        break

    results = model.track(
        frame,
        persist=True,
        classes=[0],
        tracker="bytetrack.yaml"
    )

    result = results[0]

    if result.boxes.id is not None:

        boxes = result.boxes.xyxy.cpu().tolist()
        track_ids = result.boxes.id.int().cpu().tolist()

        for box, track_id in zip(
            boxes,
            track_ids
        ):

            x1, y1, x2, y2 = map(
                int,
                box
            )

            center_x = (x1 + x2) // 2
            center_y = (y1 + y2) // 2

            previous_y = previous_positions.get(
                track_id
            )

            if (
                previous_y is not None
                and previous_y < LINE_Y
                and center_y >= LINE_Y
                and track_id not in counted_ids
            ):

                entered += 1

                counted_ids.add(track_id)

            previous_positions[track_id] = center_y

            cv2.rectangle(
                frame,
                (x1, y1),
                (x2, y2),
                (0, 255, 0),
                2
            )

            cv2.putText(
                frame,
                f"ID: {track_id}",
                (x1, y1 - 10),
                cv2.FONT_HERSHEY_SIMPLEX,
                0.6,
                (0, 255, 0),
                2
            )

    cv2.line(
        frame,
        (0, LINE_Y),
        (frame.shape[1], LINE_Y),
        (255, 0, 0),
        2
    )

    cv2.putText(
        frame,
        f"Entered: {entered}",
        (30, 50),
        cv2.FONT_HERSHEY_SIMPLEX,
        1,
        (0, 255, 0),
        2
    )

    cv2.imshow(
        "People Counting",
        frame
    )

    if cv2.waitKey(1) & 0xFF == ord("q"):
        break

camera.release()
cv2.destroyAllWindows()
This example tracks people and increments the counter when their tracked center crosses the configured line.
15. Entry and Exit Counting
We can extend the previous example to support both directions.
Maintain two counters:
entered = 0
exited = 0
Then determine the direction based on the previous and current position.
Conceptually:
Previous Position
       ↓
Current Position
       ↓
Did the person cross the line?
       ↓
Yes
       ↓
Which direction?
       ↓
Entered / Exited
A simplified condition might look like:
if previous_y < LINE_Y and center_y >= LINE_Y:
    entered += 1

elif previous_y > LINE_Y and center_y <= LINE_Y:
    exited += 1
Then calculate:
current_people = entered - exited
Display:
cv2.putText(
    frame,
    f"Entered: {entered}",
    (30, 50),
    cv2.FONT_HERSHEY_SIMPLEX,
    0.8,
    (0, 255, 0),
    2
)

cv2.putText(
    frame,
    f"Exited: {exited}",
    (30, 85),
    cv2.FONT_HERSHEY_SIMPLEX,
    0.8,
    (0, 255, 0),
    2
)

cv2.putText(
    frame,
    f"Inside: {current_people}",
    (30, 120),
    cv2.FONT_HERSHEY_SIMPLEX,
    0.8,
    (0, 255, 0),
    2
)
The dashboard could show:
Entered: 120
Exited: 93
Inside: 27
16. People Counting in a Video
The same tracking approach can be used with a recorded video.
import cv2
from ultralytics import YOLO

model = YOLO("yolo11n.pt")

video = cv2.VideoCapture(
    "videos/people.mp4"
)

while True:

    success, frame = video.read()

    if not success:
        break

    results = model.track(
        frame,
        persist=True,
        classes=[0],
        tracker="bytetrack.yaml"
    )

    frame = results[0].plot()

    cv2.imshow(
        "People Tracking",
        frame
    )

    if cv2.waitKey(1) & 0xFF == ord("q"):
        break

video.release()
cv2.destroyAllWindows()
This allows you to analyze recorded surveillance or event footage.
17. People Counting in a Store
One practical application is retail analytics.
A camera can be installed near the entrance of a store.
The system can calculate:
People Entered
People Exited
Current Visitors
Peak Visitors
For example:
-----------------------------
       STORE ANALYTICS
-----------------------------

Entered:       1,245
Exited:        1,108
Currently In:    137

Peak Visitors:  192
-----------------------------
This data can help businesses understand customer traffic.
18. People Counting in Offices
The same system can be used in offices.
For example, a camera can monitor an entrance and estimate occupancy.
The system can provide:
Current Employees: 34
Maximum Capacity: 50
Available Capacity: 16
This can be useful for smart-building systems.
19. People Counting for Events
At events, conferences, exhibitions, and public venues, people counting can help estimate attendance.
For example:
Total Visitors: 4,820
Current Visitors: 1,240
The data can be stored in a database and displayed through a dashboard.
20. Improving People Counting Accuracy
Real-world people counting is more difficult than counting people in a simple image.
Common challenges include:
People overlapping
Crowded environments
Poor lighting
Camera movement
People partially hidden
Low-resolution cameras
Fast movement
Similar-looking people
To improve performance, consider the following techniques.
Use a Better Camera
Higher-resolution video can help the detector identify people more accurately.
Position the Camera Correctly
A camera positioned above the entrance can sometimes provide a better view than a camera at ground level.
Use a Suitable YOLO Model
A larger model may provide better detection accuracy but generally requires more computational resources.
Adjust the Confidence Threshold
For example:
results = model.track(
    frame,
    persist=True,
    classes=[0],
    conf=0.50,
    tracker="bytetrack.yaml"
)
Use Tracking
Tracking helps maintain identity across frames and reduces repeated counting.
21. People Counting With a Database
A production application can store the results in a database.
For example:
people_count
-------------------------
timestamp
entered
exited
current_people
Python could then send the data to a backend API.
For example:
import requests

data = {
    "entered": entered,
    "exited": exited,
    "current_people": current_people
}

requests.post(
    "https://example.com/api/people-count",
    json=data
)
This allows a web dashboard to display real-time statistics.
22. Creating a Dashboard
The detection system can be connected to a dashboard.
A dashboard could display:
=================================
       PEOPLE ANALYTICS
=================================

Current People
      137

Entered Today
     1,245

Exited Today
     1,108

Peak Occupancy
      192

=================================
Historical data can also be displayed using charts:
Visitors
  |
  |              █
  |        █     █
  |    █   █     █
  |____█___█_____█________
       9AM 12PM  3PM  6PM
This turns a basic computer vision project into a complete analytics system.
23. Important Limitations
People counting systems are not perfect.
Tracking algorithms can sometimes lose a person's ID when:
The person becomes temporarily hidden.
Multiple people overlap.
The person leaves and re-enters the camera view.
The video quality is poor.
The camera angle changes.
Therefore, production systems should be tested using the actual camera position, lighting conditions, and expected crowd density.
The counting line should also be positioned carefully to minimize accidental crossings.
24. Complete People Counting Workflow
The complete system can be summarized as:
Camera
   ↓
Video Frame
   ↓
YOLO Detection
   ↓
Detect Person
   ↓
Object Tracker
   ↓
Assign Tracking ID
   ↓
Track Movement
   ↓
Detect Line Crossing
   ↓
Entry / Exit Counter
   ↓
Database
   ↓
Analytics Dashboard
This architecture can be expanded into a complete real-world monitoring system.
25. Complete Simple Tracking Example
Here is a compact version of the main detection and tracking functionality:
import cv2
from ultralytics import YOLO

model = YOLO("yolo11n.pt")

camera = cv2.VideoCapture(0)

while True:

    success, frame = camera.read()

    if not success:
        break

    results = model.track(
        frame,
        persist=True,
        classes=[0],
        conf=0.50,
        tracker="bytetrack.yaml"
    )

    result = results[0]

    if result.boxes.id is not None:

        track_ids = (
            result.boxes.id
            .int()
            .cpu()
            .tolist()
        )

        for track_id in track_ids:

            print(
                f"Person detected: ID {track_id}"
            )

    annotated_frame = result.plot()

    cv2.imshow(
        "YOLO People Counting",
        annotated_frame
    )

    if cv2.waitKey(1) & 0xFF == ord("q"):
        break

camera.release()
cv2.destroyAllWindows()
This is a good starting point for building more advanced people-counting functionality.
Conclusion
YOLO-based people counting is a practical example of how object detection and object tracking can be combined to solve real-world computer vision problems.
A simple YOLO model can detect people in individual images or video frames. However, reliable counting requires tracking so that the same person is not counted repeatedly.
The basic architecture is:
YOLO
  ↓
Person Detection
  ↓
Object Tracking
  ↓
Unique Person ID
  ↓
Movement Tracking
  ↓
Line Crossing
  ↓
Entry / Exit Count
With Python, YOLO, OpenCV, and a tracking algorithm such as ByteTrack, developers can build systems for retail analytics, office occupancy, event monitoring, smart buildings, security systems, and many other applications.
The next step for a production system is to connect the computer vision pipeline to a backend API and database, allowing the collected data to be visualized through a real-time analytics dashboard.